
When looking at the world around us, we rarely look closely at small objects. Macro photography is a field that opens up a whole new, often unknown world to us. The opportunity to take a close look at how complex an insect’s body is or what even the most familiar flower looks like is fascinating. If you want to start your adventure with photography of small objects or take it to a new level, I invite you to continue reading.
Macro photography, and photography of small objects
The term “macro-photography” refers to the field in which the reproduction scale is at least 1:1. Figuratively speaking, the idea is that the photographed object is at least the same size or larger on the camera matrix than in reality. A so-called full-frame camera sensor is 36mm x 24mm. So when photographing a 30mm x 20mm leaf, for example, for the photo to meet the definition of macro photography, it should fill almost the entire frame (or be any larger). Field practice tells us, however, that it is not always possible, and often not even necessary, to obtain high magnifications. After all, the aforementioned leaf filling almost the entire frame will be on the computer monitor the size of the monitor, not the camera sensor. And on top of that, a lot of details invisible to the naked eye will be visible. A completely different, enticing world.
What hardware to choose?
Although modern smartphones have a “macro” mode, we take a DSLR or mirrorless camera as the starting point for a conscious photography enthusiast. Why? Only a camera allows for conscious photography, over which we have full control. We are in control of every aspect and do not rely on artificial intelligence algorithms, whose interference in the photo is undefined.
Macro photography is the area where we have perhaps the most hardware solutions available. We can equip the camera (body) with:
- a standard lens with intermediate rings or a macro bellows;
- a standard lens with a closeup lens or macro converter;
- a specialized/dedicated lens for macro photography.
Each of these solutions has its pros and cons. However, experience shows that the one that is most flexible and gives the best quality is the dedicated lens. For macro photography, that is, enabling a reproduction scale of at least 1:1. Such lenses usually have the word “macro” in their name.
Why a lens and what kind?
A lens dedicated to macro photography is characterized, first of all, by the fact that it allows us to catch the focus on an object much closer than is the case with standard lenses. It is thanks to the special design that we can achieve the expected reproduction scales.
Choosing a macro lens is not easy either, as we have a wide range of different focal lengths available. The most popular ones are around 100mm, but there are also those with a much wider field of view (shorter focal length), as well as those with focal lengths of 150mm or 180mm. What is the difference between them? In addition to appearance, size, and weight, their most important and influential difference is the minimum distance of the photographed object. The shorter the focal length, the smaller the minimum distance from the subject (while maintaining the same reproduction scale!). This is of colossal importance when photographing live subjects – insects and other small animals (such as frogs). Taking macro photos of, for example, butterflies in a meadow is practically impossible with lenses of shorter focal lengths – they do not allow you to get close enough. In such situations, the best solution is a macro lens with a longer focal length, such as the Irix 150mm/2.8 Macro 1:1.
This lens is ideal for photography of insects and small animals (amphibians or reptiles) precisely because we can photograph our subjects without scaring them. The very solid and aesthetically made construction gives the impression of being indestructible. The focusing ring is wide and works with appropriate resistance. Its characteristic feature is a crease with a blue line, which makes it possible to know what is the set focus distance and what scale of reproduction we will get. The crease itself also helps with the precise adjustment of the ring, which is a big advantage of the Irix 150mm/2.8 Macro 1:1 lens. It should be remembered that this “glass” has no autofocus, so sharpening is done only manually. In macro photography, it is of colossal importance to focus very precisely on the right point, so with this type of photography autofocus usually does not work anyway.
The lens has an aperture consisting of 11 blades, which makes the flicker when the aperture is closed not too angular. But what you absolutely have to pay attention to is the exceptional focal length. At a focal length of 150mm, it is only f/2.8. This allows us to get beautifully blurred background color patches that do not distract from the subject photographed. Closing the aperture will, of course, obtain a less blurred background, if desired.
Macro photography – where to start
Okay, there have already been some generalities, but how does all this translate into actual practice? We assume that we have an available camera (DSLR or mirrorless) equipped with a lens for macro photography, and what next?
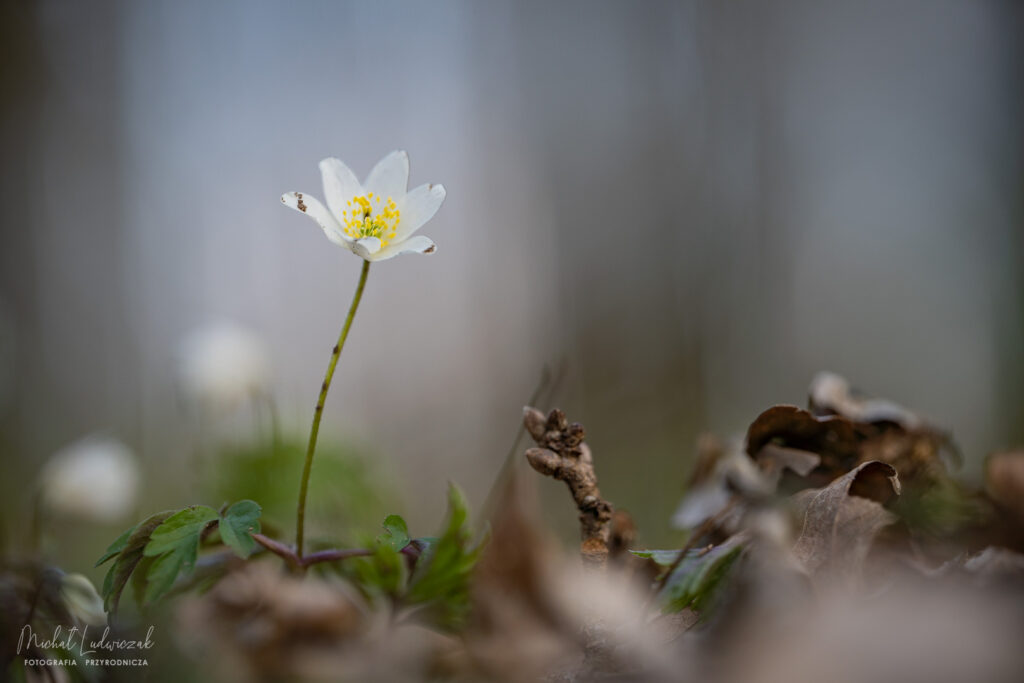
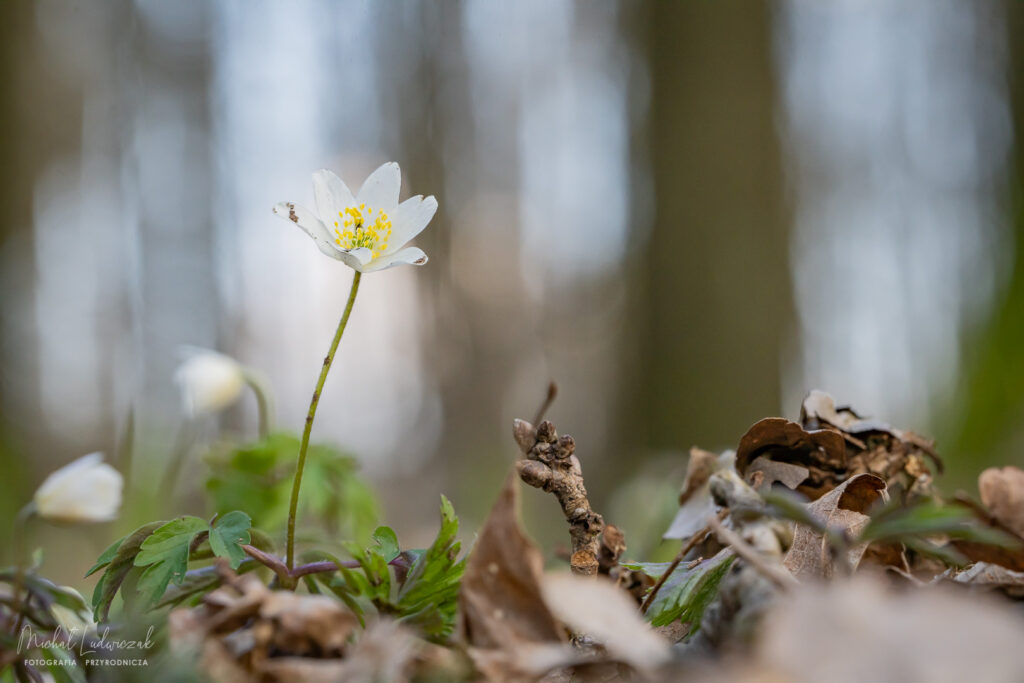
First of all, it is worth asking yourself – what specific objects would I like to photograph? You can start by going to the forest or meadow and start looking at the life there. In the spring in the woods, we can find a variety of flowers poking out of the ground – hellebores, anemones, lily of the valley, and many others. All of them make ideal motifs for photography. It is especially worth trying your hand at a mid-forest stream or pond, where, in addition to the abundance of flora, we can come across a variety of small animals. In summer, on the other hand, in the meadows, we can find a lot of insects, including variously colored butterflies. Autumn is the time of mushrooms and various colors of foliage. The most difficult period, however, is winter due to low temperatures, but even then there is no shortage of subjects for macrophotography, mainly among small snow and ice forms.
Being in any of the above-mentioned places, we should start by quietly looking at the surroundings. Any sudden movement or noise can panic our potential photographic subjects. Even if we set our sights on taking pictures of flowers, we should stick to this rule. You never know if a frog or lizard, for example, is hiding among the flora, and such an encounter can only enrich our photographic experience.
So let’s first look at how we can approach photographing flowers. A big advantage is that they do not escape from the lens and give us plenty of time to choose the right frame and parameters for the photo.
Framing and composition
Seeing a pretty anemone, one may be tempted to point the camera at it and take a picture without much thought. But even photographing flora requires thinking about the frame and choosing the right parameters. When thinking about macro photography, we’re talking about taking close-up shots. The most obvious one seems to be crouching down by our flower and pointing the lens toward it. But will a photo taken from above be the best choice? Of course, in some situations, it will be, but more often a better idea is to apply the principle of photographing from the height of the subject (in the case of animals – from the height of the subject’s eyes). So, we can put the camera on the ground, and tilt the camera screen in such a way that when crouching we are able to control the parameters and try to place the flower in the frame. If we don’t have a tilting screen, there is nothing left to do but lie on the ground (in which case a mat is very useful). With this approach, we get a view of the subject as we never have the opportunity to see it with our own eyes. And the idea is also to make the photograph surprising, to show familiar things in an unfamiliar way.
Let’s start by choosing the aspect ratio of the frame. Most cameras provide rectangular frames with an aspect ratio of 3:2 or 4:3. We also need to answer the question – of whether we would like a horizontal (landscape) or vertical (portrait) frame. We can come up with any other frame format (panoramic, square), but cropping the taken photo to the expected aspect ratio will be possible only during processing on the computer (in the so-called post-processing). There is no rule that would give the superiority of one variant over the others, it all depends on the image we want to get and what we like best.
Let’s think about where in our frame we should place the photographed flower in order to make the photo look best. The first thought that comes to mind is to place it in the center. However, such framing will work in very few cases, mainly when we want to show symmetry. The most commonly used and at the same time probably the most versatile method of composition is tri-partitioning. It consists in dividing the frame with two vertical and two horizontal lines into 9 equal parts. The places where the lines intersect are the so-called strong points – points to which our eye naturally goes.
We must not forget that a photo is not the main subject alone, but also everything around it – foreground and background. An important decision we need to make at the time of photographing is how much depth of field we want. Is our photographed subject to be presented in a fully clear (sharp) environment or do we prefer to isolate it by showing everything around as out of focus? The art of photography allows us to choose any variant using only the principles of optics. However, it is important to remember that optics has its limitations. When photographing anything at close range, we will almost never be able to get both the subject and the background in focus. “Almost never” because if we use a lens with a very short focal length, whose aperture is set to a very high value, it is possible to achieve this effect.
With or without a tripod?
This question sooner or later arises for every photographer. A tripod is a very often indispensable tool in photography. It allows you to immobilize the camera and take shake-free photos with exposure times longer than possible hand-held but also allows you to compose the frame precisely. In the above-mentioned situation of shooting with the camera placed on the ground, however, the risk of movement is much lower than hand-held, and we are able to build the frame relatively steadily. In such a situation, the use of a tripod would be difficult. However, if we want to take pictures of objects located above the ground, a tripod may be necessary.
Additional tidbits
In most situations, the information contained above will provide a good starting point for building beautiful and informed macro photography frames. I will share with you a few more patents for making your photos more interesting.
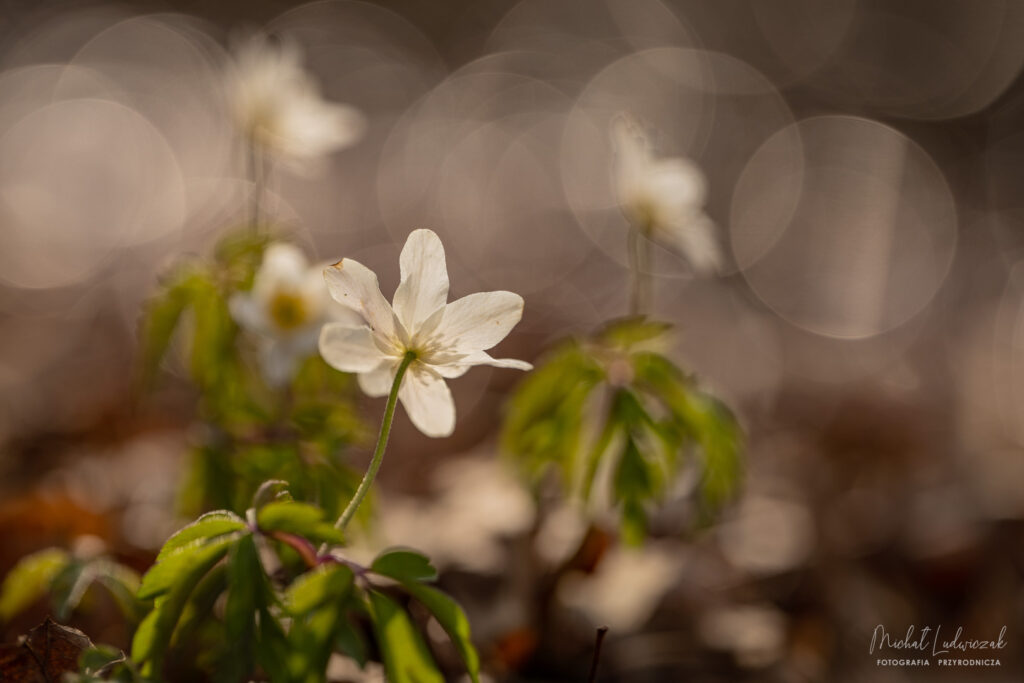
The first is to look for places to photograph on the banks of streams or even small ponds. Skillfully capturing, for example, flowers with flowing water in the background will allow you to enrich your out-of-focus images with so-called flashes, or bright circles. By setting the minimum aperture in the lens, we will get circles with a perfectly round shape. The cost is a very small depth of field, so only a small part of the photographed object will be perfectly sharp.
Another interesting trick that can be used in macro photography is a water sprayer. Sometimes it’s a good idea to take it into the field and spray the photographed flowers and their surroundings before shooting. You can then get the impression of morning dew, and in some cases, the appearance of blips that enrich the photographed scene. You can also try spraying the plant during the shutter release for a drizzle/rain effect.
Irix 150/2.8 in action
Holding the camera with the Irix 150 attached, we know that we have a solid piece of equipment in our hands – it is not light, but this positively affects the stability of the whole set. The lens, because of its weight, is equipped with an arca-swiss tripod mount ring, so we can easily mount it on a tripod and not worry about stability during shooting. It is more convenient to operate the camera set when it is the lens and not the camera body that is attached to the tripod.
It is worth noting that the entire Irix design is sealed. We don’t have to worry that a fleeting rain or moisture or sand will get inside the structure and damage it. This is very important when photographing natural subjects in places such as bogs, marshes, or even a seaside beach.
Focusing with the large rubber ring is hassle-free – the resistance is just right, and its “pitch” allows great precision when focusing. And this is especially important in macro photography, where focusing a millimeter further than we would like simply means a failed photo.
A long focal length macro lens, such as the aforementioned Irix 150/2.8, allows for a shallow depth of field. However, there is a technique for showing the entire photographed subject in focus, and it is called focus stacking. It involves taking a series of photographs, each of which has its focus precisely shifted in such a way that when all the photographs are combined into one, we get the desired effect. However, instead of turning the focus ring with each frame, we can rely on an accessory that makes this type of photography much easier – the dedicated Irix macro rail. It is enough to mount the lens with the camera on the rail and, with each photo in the series, move the set very precisely by a distance determined with the help of a mounted scale.
Below are sample photos taken with a mirrorless camera equipped with the Irix 150mm/2.8 Macro 1:1 lens.


Summary
The Irix 150mm/2.8 Macro 1:1 is a very good option for aspiring photographers who want to capture the awesomeness of the world of objects too small to pay attention to in the flow of everyday life. It is ideal for taking pictures of insects, amphibians, or reptiles, providing a longer shooting distance. It is versatile enough to also photograph the delicacy of flora with a heavily blurred background. It is perfect for creating photos that are subtle and show the surroundings in a kind of poetic way. Irix 150, compared to other macro lenses, is unique and with it, you can create exceptional photographs.